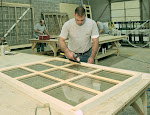
One of the most overlooked processes in a historic window project is the exterior finish. Many of the specifications that we see have an old paint spec cut and pasted from a previous project that references products that are 20 years old. There is little attention given to surface preparation requirements such as removal of old finishes, neutralization of strippers, moisture content of the substrate, or desired mil thickness. This neglect in using the best materials and proper means and methods has given window restoration a bad name and driven professionals to pursue aluminum or aluminum clad replacements to achieve a low maintenance finished product.
This post will address many of the challenges in finishing historic wood windows. If you follow the basic fundamentals of finish application, your historic window restoration will last for decades.
Neutralization
Most historic wood window projects involve the removal of existing finishes. Although there are several ways to perform this task such as steam ovens and infrared heat guns, the use of chemical strippers is most commonly used. If you use strippers, the stripper must be properly neutralized after existing paint removal or the new finishes will fail to adhere. Unfortunately, the lead-paint abatement function is sometimes performed outside of window restoration on commercial projects so the coordination of paint removal and neutralization is never achieved. We also see a lack of quality control in the field where no testing of neutralization is conducted as a matter of course. Re-View has learned that it is critical to test the pH levels of the window components prior to application of the primer. You want to use pH paper to make sure the wood has reached a level of at least pH7. We often will have to perform multiple neutralization applications if caustic strippers are used since they are absorbed into the fibers of the wood.
Moisture Content
There is nothing a painting contractor hates more than having to check the moisture content of the wood substrate prior to applying finishes. We like to have a moisture content of between 6 to 12 percent. Moisture readings in the high teens and into the 20s will cause the paint to crack or peel. We use a moisture meter made by Lignomat because it is quick and efficient and will test the moisture below the surface level. Sometimes it is challenging to achieve a proper moisture content on a historic window project. The wood can easily achieve moisture contents in the 20’s after neutralization of strippers. Rain on the project site can also contribute to higher than desired moisture readings on the window frames. Other conditions such as ambient temperature and the prevailing relative humidity can affect how long the window component needs to dry to achieve desired readings. We also find that windows located on the North or East elevations tend to dry at a slower rate than the South and West. Given all of these variables, it is understandable why the moisture content of the wood isn’t a cut-and-dried subject.
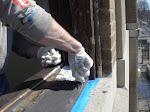
Surface Preparation
It also makes sense that the surface to be painted should be clean from debris, oil, mold, or dust. In this industry, however, surface preparation is often the most neglected function. We have seen many painters who will apply paint to most anything that doesn’t move. In fact, I saw a dead dog years ago that had a street line painted over it. Although proper surface preparation such as power washing prior to painting forces another step in the process and adds time to the project, it is an essential element to a long lasting finish.
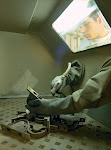
Quality Control
Another step in the finishing process that is often neglected is quality control. We like to incorporate mil thickness and adhesion testing in all of our projects. The mil thickness test can be performed by using a non-destructive testing device that doesn’t damage the finish. Although this meter is expensive, it can be good insurance and forces the painters to pay attention to details. You might be able to gain access to this tool by asking your paint supplier. The adhesion test is another quality control process that can be accessed from the paint manufacturer. Our Sherwin Williams representative has been very helpful in conducting random testing on the adhesion of the finishes to assure proper surface preparation and finish application. A simple cross-cut test can verify if all means and methods have been correctly followed.
Although the content of this post is very elementary, we see far too many projects where the basics are often neglected. If you pay attention to the finishing fundamentals, your historic window finish will perform for many years. Click on the following link to see a slideshow about historic window finishing: https://www.facebook.com/media/set/?set=a.348985885157425.83223.118211914901491&type=1#!/media/set/?set=a.348985885157425.83223.118211914901491&type=1
Tuesday, May 1, 2012
Subscribe to:
Posts (Atom)

