Thursday, November 10, 2011

Do You Have the Energy

The construction industry has been sold a story that historic windows are energy hogs that are largely responsible for the depletion of fossil fuels in the United States. I am not going to dive into that debate at the moment because I am not in the mood to mud wrestle with the major window manufacturers. This post is going to address the different options you have in converting historic wood or steel windows into energy efficient systems. Re-View has been successful in upgrading the energy energy performance of 100+ year old windows to meet or even exceed modern manufactured windows.

The most common method known in the construction industry for enhancing the performance of an old single-paned window is the use of a storm window. Storm windows have come a long way in the last 15 years. Instead of the flimsy mill-finished behemoths of yesteryear as pictured below, the new storm window designs are made of extruded aluminum and have low profile sash and frames so they don't distract from the window. You can match arches at the window heads and even find storms that have bent glass to match the radius of a curved window. There are also many different methods of attaching the storms to facilitate simple cleaning and maintenance. Removable fasteners, operable clips, and magnetic mounting techniques are used to eliminate the albatross effect of a traditional storm window.


Although storm windows sound very simple in concept, you can run into problems. The first is to make certain you are measuring the window opening in the same manner as the manufacturer. You may also need to take several width measurements for tall windows to adjust for irregularities. We have seen many installations where the storm just didn't fit the opening. It is also critical to allow for some ventilation between the storm window and the existing window system. We had a project a couple of years ago where moisture caught in the wall cavity caused condensation between the storm and the primary window. If you are doing a residential project, it is essential to pay attention to egress codes; fixed storms or a design that limits the opening size may not be a possibility.

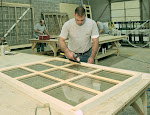
Re-View is currently engineering an energy panel system that puts a typical storm window on steroids. Can you imagine a historic wood or steel window with an R Value approaching 7 or even higher? Our product has a frame made of a combination of aluminum and wood with high-efficiency insulated glass with multiple Low E coatings. By combining aluminum with wood, we are able to increase the structural characteristics while we advance the thermal performance of the framing material. We also enable the customer to apply custom finishes by either staining the wood or matching any custom interior enamel finish. We can fabricate the system in virtually any wood species so matches to interior millwork will be seamless as evidenced by the picture below of one of our installation in a historic train depot. Please contact us to discuss how such a revolutionary technology might be incorporated into your next project.


Another way to improve the energy performance of historic windows is to convert the single pane glass to insulated glass during the restoration process. We haven't found many steel windows that have the required depth to enable such a conversion, but wood windows are ideal candidates. On a typical wood window sash that is 1-3/4" thick, we are able to remove approximately 1/4" from the interior profile of the window to allow for the thicker glass. (See picture below) The glass is glazed with a mahogany stop that is completely primed on all sides and both ends prior to installation. Don't be tempted to use glazing compound like the original single pane installation since the compound is incompatible with the insulated glass seal. This will only accelerate seal failure of the glass. The wood stop is milled to a profile that replicates the glazing compound so you can't tell the difference between a stop glaze and the old compound glaze.


Insulated glass can also be introduced into a historic window system by fabricating an exact replica of the original sash with the exception of the insertion of insulated glass. The new sash would share the design of the original in all aspects such as size, shape, profiles, and joinery. We are able to include up to 5/8" insulated glass into a 1-3/4" thick replicated window. The sash is then hung into the original window frame using the existing pulleys and augmenting the weights to balance the heavier glass. Re-View is one of the largest historic wood window manufacturers in the country, using virtually any wood species and glass type available. The picture below shows a radius or bent sash replica we fabricated for a Governor's mansion project.


Finally, there are ways to incorporate modern weather stripping into the historic window design without changing the form or function. We use what is called fin seal in hidden areas such as the edge of the sash or the back side of the sash stop. Fin seal does an excellent job of eliminating air infiltration. We also use polyethylene clad, urethane foam seals at critical areas such as the rails of a double hung window or the perimeter of the frame of a casement as pictured below. All of these weather strips are invisible when the window is closed. In addition to the modern weather strips, we are still believers in some of the traditional metal weather seals since they last forever and are effective performers. We have achieved independently tested air infiltration rates that are actually superior to the published rates from the major window manufacturers.


As you can see from the above, there are many options to advancing the energy performance of historic wood and steel windows. All it takes is a little time plotting a strategy that works best for your window design, targeted performance values, use of window, and budget.

Tuesday, October 4, 2011

Don't Do This At Home

Todd Maxwell and I drive people crazy with our obsession with windows. We often find ourselves making impromptu visits to project sites to evaluate window installations. Just yesterday for example, I was accosted by a security guard at the Nelson Atkins Museum of Art for inspecting their Profilit glass walls. This past week, Todd and I were traveling in Kentucky and Alabama when we ran across a couple of window restoration projects that displayed glaring quality defects. I thought that by sharing some of these conditions I could help you better navigate your next preservation project.


Most project construction documents and specifications outline all of the processes and materials to be utilized in the window restoration scope of work. The construction team focuses on what has to happen to make for a successful project. In this business climate where bids for the same scope of work can vary by 100% or greater, it is also important to focus on what definitely cannot happen on a project. The last thing you need to happen is for the low bidder to work substandard materials and abbreviated means and methods into your project. The following two projects we surveyed last week have some excellent examples of what should never happen on a window restoration project.

The first project involved a wood double hung window restoration where the existing frame, trim, and sash were to be restored, sash to be reglazed, and the entire system to be painted on the exterior and stained on the interior. The sash were to be set as fixed in the opening. Typically the window sash would be removed to be restored, glazed, and finished in an offsite environment. The frames would be abated in place and finished in the field. We discovered the following problems on this project:

The restoration contractor left the lifts, lock, and pull down hardware on the sash when it was stripped. The sash was then sanded without removing these elements. You can see by the picture below how the lift was sanded during this faulty process, causing scratch marks. You can also see evidence of stain that was not removed around the perimeter of the hardware since it was impossible to contact with sand paper.


Most sash have unique wood profiles on the stiles, rails, and muntins. One needs to be very careful not to excessively sand these profiles or they will be completely removed or distorted. We often have to replace sections of a sash because the original profile has been damage beyond repair. Take a look at the profiles on this sash for a good example of how not to sand during the restoration process.


We often run into sash that has interior cracks, scratches, or gouges. If the project calls for a stained interior, it is challenging to fill these areas with a custom color filler that will match the selected stain. The restoration contractor on this project found it acceptable to leave the gouges untreated. Should make for and interesting distressed look once it is stained. We shall call it historic hammered wood.


We run into sash with lugs on the lower sash quite frequently. It is important to restore these architectural elements since they are so visible from the interior. We often find interior lug damage. The following picture shows how this restoration contractor completely ignored the condition of the interior lugs.


Frame restoration is also a major part of a window refurbishment project. We spend a lot of time on the sills, brickmould, and mullion covers. We also run into missing or damaged weight pocket doors from time to time. These doors are designed so they can be secured with only one screw that holds them very tightly in place. Look how this piece of pine was scabbed in with a visible fastener and a wide crack to replace a missing weight pocket door.


In many cases existing frames and sash have to be completely replaced because they are missing or damaged beyond repair. We utilize a matching species of the finest grade of wood, or a durable hardwood like mahogany to provide replicated parts. We also cull through the material to eliminate defects like knots, cracks, checks, or worm holes. The framing material used in this project looks like pine that was recycled from a wood pallet. The exposed knot is not only an aesthetic problem but could be a structural one as well.


The original single pane glass on this project was reused in the sash. It is very challenging to find people who still know how to putty glaze windows. We spent months trying to find a replacement for a retired craftsman at Re-View. Take a look at the sloppy lines of this putty job.


We visited another project site that had hundreds of historic wood casement windows. The scope of work for this project included restoring the frames and the sash and then converting the sash to insulated glass. All of the sash work was conducted by a company that specializes in shop restoration of historic windows. We found major problems in both the sash and frame restoration on this project.

Converting a historic wood window sash from single pane to insulated glass is more complicated than it looks. The engineering of the muntins, the glazing materials, and the glass has to work in concert. If the glass size is incorrect or the glazing stops are installed improperly, you can have an unsightly sash that will leak and have seal failure in a matter of years. Take a close look at this IG conversion we ran across last week. The restoration contractor failed to use low profile spacer bars in the insulated glass so 1/8" or greater of the black spacer bar sealant is visible on both the interior and exterior. This black shadow could have been eliminated by using the proper type of glass and by measuring each lite with precision. At Re-View we measure each glass lite with a laser.


One of the most overlooked processes on a window restoration project is the application of finishes. The proper selection of finishes, prep work of the substrate, and application techniques are key to a good finish. Add in considerations like relative humidity, exposure to the sun, and temperature variances and you can see why it is challenging to achieve a quality paint job. Take a look at the picture below of a frame that was restored and finished only seven years ago. The contractor failed to neutralize the strippers used to remove the original finishes. This improper neutralization caused catastrophic failure of the new finishes. The result is a seven year old restoration project that looks worse than the windows did before they were refurbished.


Please feel free to contact Re-View to discuss historic window issues. One thing we like about this business is that we are always learning as well.


Wednesday, August 17, 2011

One Butt to Kick


Most historic window restoration projects involve a team of different companies combining their expertise to complete the total scope of work. A typical project takes experienced abaters, carpenters, glazers, and painters, as well as a qualified window restoration company or a manufacturer of historic replica windows. Sounds like a recipe for confusion. A classic example of too many cooks in the kitchen.


It takes a great deal of experience and discipline to manage all of the associated activities of window restoration. If you haven't had the pleasure of managing a historic window project, you will find that there is a high cost of gaining such experience. Whenever you get a group of unrelated subcontractors together to perform their respective trades, you have an opportunity for dropping the ball or suffering scope conflict. The following are some examples of problems that can plague a typical window restoration project:


  • Scheduling the different trades is always a challenge and when you combine an abatement, restoration, glazing, and painting subcontractor with a window manufacturer, there is plenty of potential for serious delays. Many of these companies are very small specialty shops that can easily get bogged down with other work that will inhibit their ability to perform on your project. It is very important to line out the schedules of all of the trades and get a commitment from all of the players. It is also important to select players who have the capacity to meet the respective deadlines. Check backlogs of work and visit the facilities of each sub to verify availability.


  • It is critical that the various trades understand their scope of work and how it affects the trades that follow. The last thing you need is to have an abatement contractor tear up a wood window in an attempt to remove lead-based paint. We have seen many projects where one trade contributes cost and delays to the subs who follow because they either don't care or don't understand the big picture.


  • Quality control at each step becomes a major burden in managing multiple trades. You will have big problems if you rely on each subcontractor to monitor their own work and fail to regularly check on their progress. We have seen problems with failures to neutralize strippers, excessive use of epoxies, insufficient paint mil thickness, faulty glazing, or sloppy carpentry. It is amazing how even a small quality control problem can derail an entire project.


  • The instability of our current economic environment also places a risk factor in managing multiple subcontractors to perform a window restoration project. As a consequence, we have seen a dramatic increase in bonding requirements for basic preservation projects. Many of the small specialty subcontractors in this business can't bond their work, increasing the risk for the general contractor.


  • Often window restoration projects are awarded as bid packages where the lead contractor strings together his subs and bids the package to the construction manager. This type of project management can become expensive since the lead contractor is marking up all of the subs who have individual G&A and profit markups in their price as well. There really isn't room for multiple markups in this economy.


  • I must give my economics professors of the past a little recognition and mention the opportunity costs for a general contractor to manage multiple subcontractors on a window restoration project. All of the time spent on scheduling, quality control, and scope conflict could be spent on other work associated with the project. Windows shouldn't occupy a large percentage of the building team's time.

For many of the reasons outlined above, we are seeing an increase in specifications that demand a single company to manage all historic window activities. These projects are referred to as single source responsibility or turnkey scopes of work. The people at Re-View refer to this as our "One Butt to Kick" philosophy.

Eleven years ago, Re-View recognized the benefit of becoming a turnkey operation. We grew weary of having to deal with the problems and challenges of our many subcontractors. When you enter into a business contract with another company, you are getting into bed with this organization for the duration of the project. You are buying into the ownership and employees of all your subs. We found that problems and delays caused by subcontractors, manufacturers, and suppliers became our greatest challenge to successfully completing a project. To compound our ordeal, there seem to be very few companies that have experience in this field. It isn't like you can quickly change horses when one of your subs is swamped with other work or goes out of business. That is a big reason why the bonding companies seem to have a distaste for this industry.


Re-View has successfully developed competencies in abatement, field and shop restoration of wood and steel windows, manufacturing of historically correct wood windows, window finishing, and union field installation. Since we control the resources associated with these disciplines we can more effectively manage scheduling and produce better and more consistent quality. The ability to provide a turnkey package also enables our company to become better at everything we do. For instance, our ability to manufacture historic window replicas is improved when we understand the complexities of window installation.


Tuesday, May 10, 2011

Historic Ballistic Window Hits the Target


Re-View was presented with the challenge of how to create a double hung window that carries a UL 752, Bullet Resisting Equipment, Level 8 rating.


And by the way, it has to look like all of the other historic wood windows at the Kansas Statehouse project.


Our craftsmen had already restored hundreds of historic wood double hung windows on this project in different phases. We essentially had to reconstruct the original wood windows after they had been butchered by a previous window replacement project decades ago. Our carpenters rebuilt the frames in the field and then installed custom mahogany sash fabricated by the Re-View plant. The sash matched the original design except for the inclusion of energy efficient insulated glass. Since the average window was 56 inches wide by 150 inches tall, they were striking in a monumental way.


Then came the challenge to design and manufacture a ballistic version of these historic wood windows. The design would have to stand up to a 7.62 mm caliber, lead core, full metal copper jacketed ball, shot at 15 feet at an average velocity of 2,760 feet per second. There are several window manufacturers in the country who specialize in fabricating ballistic windows to meet these standards, but nobody can make one look like an exact replica of an 89 year old wood window. That is until Re-View was allowed to take a shot at it.


Re-View responded with a very unique design. The frame consisted of a 1 inch thick solid steel bar that was 8 inches wide. The frame parts were coped and butted and fully welded at the corners. Each simulated sash member was constructed of 2 inch square steel tubes with 1/2 inch plates covering the exterior surface and 1/4 inch plates covering the interior. The simulated meeting rail was constructed of solid steel with a machined glazing pocket. All connections were coped, butted, and welded. The glass was 2 inch thick laminated security glazing with a UL rating at Level 8. An interior of 9/16 inch thick African mahogany wood veneer covered all interior surfaces to give the window the same wood stained look as all of the original wood windows. We even installed fake pulleys, locks, and sash lifts to make the replica look like the originals.


Re-View tested the component pieces of the window design at a shooting range in rural Missouri by one of our craftsmen who specializes in ballistics. The test results proved to our engineers that the resulting window system could easily pass an official Level 8 test. We then contracted with Architectural Testing in York, Pennsylvania to conduct an independent test on a complete window specimen. The standardized test as conducted by ATI involved shooting the window 13 times in designated locations. Re-View's historically correct ballistic window passed with flying colors.


The Re-View plant manufactured only 11 of these mammoth windows measuring 5 feet wide by over 12 feet tall. Each window weighed in excess of 7,000 pounds. Our engineers and field carpenters had to develop a strategy just to install these behemoths that involved cranes and suction cup lifts. Sometimes our field installers wonder whether our management is insane to engage in such projects.


If your historic preservation project is filled with challenges, give the people at Re-View a call at 816-741-2876.


Wednesday, April 6, 2011

The Hard Facts About Window Hardware

We have found that most specifications for the historic treatment of windows neglect to address the area of hardware restoration in sufficient detail. Most specifications dictate that existing hardware should be cleaned and repaired so it operates properly or replaced in kind if it is missing.

Your typical historic wood double hung window has lifts, locks, pulleys, ropes or chains, and maybe pull sockets and sash stop adjusters. I am going to take a look at each of these elements to emphasize the importance of outlining the scope of work desired for a project in the construction documents.


Lifts

The typical historic restoration project has lift hardware in a wide variation of condition. On the same project you will find lifts that are tarnished, painted many times with the window interior, and missing completely. It is very important to define the desired finish of the restored lift. Most lifts are brass which can have a multitude of patinas or be polished to a US3 bright brass. Some are steel and will require plating to achieve a desired finish. There is a significant cost difference between just cleaning the existing lift and applying a custom plating. It also helps to have replacement lifts defined by model number rather than leaving it up to the contractor to guess what is a suitable facsimile. Architectural Resource Center is a good source for many of the styles of lifts and other historic window hardware and can be found at their website at http://www.aresource.com/ .


Locks

A high percentage of historic locks are either broken or missing on a typical restoration project so the replacement model is important if you want to assure a proper match to the existing. I would estimate that 80% of the locks on preservation projects are a standard sweep lock. The other 20% are specialty designs that may or may not be available to purchase over the counter. Often custom molds must be made for casting these one-of-a-kind elements. We see many historic projects that call for converting the sash to insulated glass or replacing the sash with a replica with insulated glass. These projects also call for restoring the locking hardware and applying it to the sash. Unfortunately, you cannot use the old lock on a sash with insulated glass because the thicker glass occupies the space where the old lock strike resided. You have to purchase a new replica lock with a narrow strike mount that is designed to fit the narrow channel.


Pulleys

On most projects we see in the field, the pulleys have just been painted over and are completely neglected as part of the restoration process. We recommend removing the pulleys for restoration. All finishes should be removed and a new plating applied or a custom cover installed that has the desired finish. The wheel should also be lubricated to avoid squeaking during operation. Some projects call for replacing the ropes with chains because they are more durable and ascetically appealing. Remember that a rope pulley is distinct from a chain pulley so any change in material could involve a change in the pulley.


Ropes and Chains

It is important to specify a rope that has a steel cable in the center for historic double hung windows. If you don't ask for this, you might have a conventional rope installed that isn't rated to handle the weight of the sash. Ropes without cables also have a tendency to stretch. There are many variations of sash chain with a host of finishes. We prefer solid brass, bronze, or stainless steel rather than plated steel since the plated steel has a proclivity to rust. It is important to use the size of chain that has the capacity to handle the weight of the sash and the size of the pulley. This can be challenging if you are converting the sash to insulated glass and thus increasing the weight of the sash.


Pull Sockets

The pull socket is usually a round brass socket fixed to the top rail of the upper sash. They are found on a third of the windows we work on. The socket allows the occupant to utilize a pole to secure to the socket allowing operation of the upper sash. On most projects, these sockets are just painted the same color as the sash. They should be finished in the same manner as the rest of the hardware so they match everything else and stand out as an architectural element.


Sash Stop Adjusters


The sash stop adjuster is that little grommet and fastener that hold the sash stop in place. I would estimate that half of the projects out there have this form of fastener. You will also find sash stop that is installed with finish nails. It is very important to install new sash stop adjusters in a matching finish to the other hardware. Most existing adjusters are either painted or tarnished and you really miss out on an opportunity to dress up the window by matching the other hardware finishes. Although the adjusters go for about $0.65 a piece, they are certainly worth it.


Fasteners

It is also important to specify the desired screws. If you don't call out for slotted or what are more commonly known as flat screws, you will get phillips screws since they are much easier to install with a screw gun. A truly authentic restoration will call for slotted screw heads to match the existing. We even run the slots in the same direction on all of the hardware for consistency.

Tuesday, February 15, 2011

Let There Be Light


Re-View recently had a "Green" experience that could help many companies of all types.


We were founded 18 years ago on the basic principle of resisting the status quo, and are constantly searching for ways to advance our organization. Our plant manager had been reading several studies about how proper lighting can improve the quality of work and increase productivity. Given this information, he commissioned a study on how to effectively improve the lighting in our window plant. He was motivated to use efficient changes in lighting to improve the throughput in the plant. He was also convinced that increases in lighting in certain areas would reduce defects and rework.


What our plant manager didn't realize was how changes in light fixture and bulb technology could dramatically impact the electrical consumption of our plant. We brought in a lighting consultant who evaluated the current fixtures and the illumination throughout the facility. Our management then established target foot-candle ratings for the different areas of the plant, increasing the levels in areas where precision work was performed.


Like many production facilities constructed in the late 1960's, our plant has a combination of sodium vapor high bays and T12 fluorescent drop lights used to illuminate working areas. The lighting consultant quickly identified how we could achieve a three-year payback by replacing our existing system with six-lamp T5 fixtures. The team took a CAD drawing of our plant layout and established a lighting plan that would achieve 30 foot-candles in general areas and 50+ fc in areas where product detail is critical.


We recently tested the installation and discovered that in the assembly and fabrication areas of the plant where we used to have 15-20 fc, we now average 58-60 fc, and all shadows are eliminated. The aisles had 7 fc before the change and now are averaging 30 fc. Our plant employees are now asking for sunglasses and sunscreen.


The team at Re-View is always looking for ways to improve product quality and to reduce costs. We have invested in automated CNC fabrication equipment, computer-controlled saws, computerized glazing, and automated finishing systems. We came across many reports documenting improvements in productivity that were directly associated with changes in lighting. Since our windows are furniture-level quality, we were confident that advances in lighting would enable our craftsmen to perform better work. We also read reports about official improvements in employee satisfaction and safety due to upgrades in lighting. More information on the benefits of lighting can be found on this link: http://www.lightcorp.com/PDFs/industrial/learn/ImpactProductivity_DD1A8.pdf


What our team didn't realize was how advancements in lighting fixtures could also significantly reduce our electricity costs. We are going to recognize a payback on the investment in fixtures and the labor to install within the first three years. That is an amazing return especially since we aren't including the other effects of productivity and quality improvements that will certainly be achieved. Our results profoundly prove that Green building practices really do pay.

Thursday, February 3, 2011

The Panes of Putty


A customer of mine commented the other day that putty glazing windows is a lost art and I would have to agree with him. As is the case with any art form, there are many hidden challenges in the proper usage of glazing compounds. I am going to address the problems to avoid when finishing glazing putty.

Glazing putty is a mix of boiled linseed oil, calcite lime, inorganic fillers and other common elements. The most popular brand is DAP 33, but there are other manufacturers such as Sarco that produce the similar material. It takes a great deal of practice and patience to become proficient at forming the putty in a straight line and tooling crisp corners. You can find several articles and YouTube videos that might help in accelerating your learning curve. A link to the DAP product data might also be helpful: http://www.dap.com/docs/tech/00010401.pdf

Most people have no concept of how long it takes for glazing compound to cure. Inexperienced users are astounded to discover that it can take up to three weeks to cure depending upon temperature, humidity, and thickness of the application. We have been able to reduce the curing time by introducing heat and fans in a specially designed curing oven. The biggest mistake we have seen in the use of putty is when it is finished prior to proper curing. When this occurs, the paint finish will lose its adhesion and display bubbles, cracks, and wrinkles. It is essential to wait until the glazing has skinned over and attained a firm set prior to applying any finish.

Another problem can occur if the wrong combination of finishes is applied to the glazing compound. Many people want to avoid the priming stage of finishing, which can be catastrophic. A good oil-based primer should be used prior to applying two coats of latex finish paint. Since the putty is linseed oil based and since the compound is flexible and continues to move as it fully cures, the superior adhesion qualities of an oil-based primer is essential. Failure to properly prime the putty can cause your finishes to delaminate.

One should also be careful in using certain finishes over glazing compounds. This especially occurs when putty is used to glaze steel windows. Most finishes designed for metals are not designed with the same elasticity and flexibility of traditional latex-based paints commonly used in wood finishes. The manufacturers of fluoropolymer paints and other steel finishes state that their finishes are not flexible enough to be applied over glazing putty. This type of finish is considered a rigid system and it will crack and eventually delaminate with any movement or thermal expansion or contraction of the glazing material.


Wednesday, January 12, 2011

Restoration Epoxies


The use of restoration epoxies is pretty standard for a wood window restoration project. These two-part systems have become common tools of the trade over the past fifteen years. In the past ten years, several manufacturers have entered the business from mainstream brand names like Minwax to obscure names like Gougean Brothers. One thing is perfectly obvious, restoration epoxies have been a revolutionary development for preservationists.

The manufacturers of restoration epoxy do a decent job of providing directions on the use of their products, and what type of precautions one should take when mixing and applying the material. For example, West System has directions for using their products for various restoration projects. The following link displays many possibilities: http://www.westsystem.com/ss/use-guides/ Abatron has a very useful video on how to mix and apply their products to wood on the following link: http://www.youtube.com/watch?v=2yGQMnmNK1Y&feature=player_embedded

Unfortunately, the manufacturers provide only the basic information on how to safely apply their products and neglect to inform the purchaser on the finer points of product utilization. A great deal of the instructions focus on the CYA that is required when you sell a product that can have hazardous consequences if ingested or used improperly. There are a couple of critical problems that can occur with restoration epoxies that are neglected in the typical instruction manual.

The first problem is the importance of the moisture content of the wood that is being restored. Most restoration craftsmen don't take the time to test the moisture content of the restored wood. Since the wood elements must have their existing finishes removed prior to the application of the epoxy, sills, brickmould, frame members, and sash can often be exposed to the elements after all finishes are removed. They can absorb moisture during this period of exposure. The neutralization of strippers used to remove these finishes can also increase the moisture content of the wood. If the wood has a moisture content in excess of 12%, you can have future problems with the adhesion of the epoxy fillers. The last thing you need is to have
epoxy fillers cracking and buckling. We find that it is important to measure the moisture content of the wood substrate prior to application of the restoration epoxies. There are several moisture meters on the market that are excellent tools for this measurement. We advocate the use of a meter that facilitates moisture measurements below the surface of the substrate. You can have acceptable readings on the surface while the heart of the section of wood is reading 25% moisture content. We use moisture meters manufactured by Lignomat that have two tines that penetrate deeply into the wood. You can find more information on this product by following this link: http://www.lignomat.com/MoistureMeter/index.html

Another challenge we have found with restoration epoxies is the tendency to over apply the epoxy fillers to a wood member. You see this occur particularly on sill reconstruction on a wood window. Many sills that have been neglected for the past 50 years have lost much of their original profiles. If you use the restoration epoxy to completely rebuild the sill to the point where all exterior surfaces are encapsulated in 1/4" or more of the epoxy filler, you run the risk that you will encapsulate the entire wood substrate. Wood must be allowed to breathe. If it doesn't have adequate means to adjust its moisture content, it will either rot or cause the epoxy filler to lose its bond.

If used properly restoration epoxies are an economical and durable way to breathe new life into a historic wood window.