

Thursday, September 6, 2012
Let's Not Get Too Testy
Testing in the fenestration industry has been practiced for many decades especially in the commercial sector. It has long been a common practice to conduct mockup tests on custom curtainwall designs that are project specific prior to fabrication and installation. These tests assure that the details as designed will perform as intended under the harsh realities of Mother Nature. The industry has also accepted testing of new window and door products to equip the consumer with an understanding of what they are actually purchasing. There is a big difference in structural, thermal, and air/water infiltration ratings for the hundreds of different window designs made from steel, aluminum, wood, vinyl, and fiberglass. Testing of these products enables one to determine the differences between various products. Architectural window testing has served the industry well in defining performance, influencing design, and establishing quality control. It is only natural, therefore, to be tempted to apply standardized tests to existing historic wood and steel windows for a preservation project. For this to be a rewarding experience, however, one must think before applying a boiler plate testing standard to a preservation project.
There are several agencies and organizations that are involved in the testing of windows and doors such as American Architectural Manufacturers Association (AAMA), American Society for Testing & Materials (ASTM), Window & Door Manufacturers Association (WDMA), Canadian Standards Association (CSA), and the American National Standards Institute (ANSI). ASTM for instance has drafted testing methodologies for windows and doors that evaluate specific performance metrics for the specimen. For example, an ASTM E2068 rates the force required to open a window, ASTM E283 tests for air infiltration, and ASTM E547 evaluates the water resistance of the window system. These agencies often work together in defining new standards. Back in 2008, AAMA, WDMA, and CSA combined to draft a standard that is widely used in North America called the 101/IS.2/A440. A full battery of tests on a window will include evaluating the window’s resistance to forced entry, structural integrity, deflection of the window under structural loads, resistance to water and air, and the force required to open the window.
So if these agencies have contributed so much to understanding the integrity of newly manufactured window systems, one would think that you should be able to incorporate similar testing towards the evaluation of historic wood and steel windows. Unfortunately, that isn’t always the case. Most historic wood and steel windows that were manufactured 75+ years ago were not designed to pass modern-day testing standards. That doesn’t mean they are unsuitable for the structure, it just means they won’t pass many of the current test standards. Air infiltration and water resistance testing are most commonly requested on historic windows. I will save you $4,000 and a lot of headaches by informing you that a 75 year old wood double hung will fail an AAMA 502 water test. You can minimize this effect by installing storm windows, but a redesign of the sill and weather stripping must be done if you are going to achieve modern performance levels on a water test. It is important, therefore, to understand what are the realistic performance expectations of your existing historic windows prior to considering applying a testing criteria to the project.
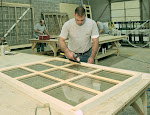
There are situations where testing of historic windows makes sense. We have found testing to be very valuable when you have a situation where the entire window system must be replicated. In these cases where everything is going to be replaced with a custom, one-of-a-kind window, this distinct design should be tested. Re-View has manufactured thousands of complete replica window units that match the original drawings of a historic building. We recommend testing any new design that hasn’t be subjected to the testing criteria in the past as a means to insure that the product engineering performs as anticipated. Since the tests are designed to subject the window under peak stress conditions, product design deficiencies quickly rise to the surface. We learned a great deal about adapting the design of the sash, glazing, frames, finishes, and weather stripping as a result of our many test experiences.
I thought it might be helpful if I shared some actual lessons we learned while testing windows over the years:
• The area where our frame jambs meet the sill had to be completely redesigned after a test many years ago because water penetrated this joint. Originally our means of sealing this joint was similar to very widespread industry practices. If it weren’t for the water test, we wouldn’t have known that this joint is a common weakness in many window designs.
• One would think that windows fabricated by large international manufacturers would easily pass a random water test, but we had catastrophic failure on a field test of a frame design of a standard product offering from one of the largest wood window manufacturers in the world. So don’t completely trust published testing statistics on existing designs.
• We have experienced immediate failure on water testing of standard historic double hung windows because the rise in the sill isn’t high enough to withstand the rise in the water when it is put under pressure during the test. That is why you see modern windows with a sill design that rises above 1-1/2 inches.
• We experienced glazing leakage very early in our history during a test that influenced a total redesign of our glazing design and methods of application. The results of this test inspired us to invest in automated glazing equipment, purchase different types of sealant, and redesign the glazing rabbit on our sash.
• We discovered that ballistic glass will fail if you hit the same area with a second round.
• Our engineering team enjoys pushing the tests beyond the standard criteria. It is quite common for us to take the tests to another level to push the window to a point of failure. We have learned a great deal about structural issues and water penetrations by amplifying the testing way beyond the published standards. It can be pretty alarming to see a massive window specimen literally blow up before your eyes when exposed to pressures many times the test standards.
• We conduct accelerated testing of paint finishes whenever we evaluate a different species of wood or alternative finishes. We also incorporate adhesion testing of field applied finishes as a quality control mechanism. Our plant uses non-destructive paint mil thickness testing as another QC tool.
Take a look at our Facebook page to see pictures of many of the tests we have conducted on our historic window designs in the past:
https://www.facebook.com/media/set/?set=a.405489146173765.95095.118211914901491&type=1#!/media/set/?set=a.405489146173765.95095.118211914901491&type=1
Tuesday, July 10, 2012
Scantily Clad Windows
What many of our customers don’t know is that the ownership of Re-View cut our teeth in the window business by selling and installing aluminum clad wood windows. We have installed thousands of windows manufactured by the largest window manufacturers in the world, including Andersen, Pella, Marvin, Eagle, and Weather Shield. Over the past five years, these manufacturers have made significant efforts to market their products as replacements for historic wood windows. Designers who are attracted to the prospect of low maintenance and energy efficiency are buying the message and specifying aluminum clad wood windows as replacements for wood windows that have lasted for 100+ years. Unfortunately, there is a serious problems with using aluminum clad wood window replacements in historic applications.
The big selling point for the aluminum clad wood window manufacturers is the concept of a low maintenance exterior. Clad windows are designed with an exterior skin of aluminum applied to the exposed sash and frame parts that has a baked on finish applied at the factory. The manufacturers use either roll-formed cladding or extruded cladding on their windows. Roll formed cladding is very thin which makes it easy to bend and form into tight shapes and profiles. It is less expensive than extruded aluminum since the material is so thin. Extruded aluminum, on the other hand, is much thicker and must be extruded through a die to create a desired shape. Extruded cladding is more impervious to denting than roll formed cladding. The cladding is typically connected to the wood through a clip system or other mechanical methods.
The marketing tune played by the large manufacturers includes never having to paint your windows again. This is a very attractive message for schools, courthouses, and offices that don’t have annual maintenance budgets for finishing. Unfortunately, most of the major manufacturers have catastrophic errors in their cladding and sash designs that seriously limit their life expectancy. You may not have to ever paint the aluminum clad wood window, but you will have to replace it within a 10-30 year timeframe.
The cladding on the sash of most of the window manufacturers is sealed to the glass with either a glazing tape or butyl sealant. Both of these methods have a 10-year life span at best so at some point, water is going to penetrate this seal. Many of the manufacturers recommend applying a cap bead of silicone to the sash to prevent leaks. Unfortunately, none of the major wood window manufacturers incorporate water management into their designs. The glazing pocket is typically unfinished wood that has only been surface treated with a wood preservative. There are no weep holes built into the glazing pocket to allow water to escape. Once water breaches the main seal, it will be contained within its built-in sarcophagus, accelerating the wood rot process. This major design defect is the primary reason the wood window industry is under attack. Just get on Google and type in “class action lawsuit against wood window manufacturers” and you will see what I mean about the wholesale wood rot epidemic eating at the heart of the industry. These wood rot problems have also fueled the growth of aluminum, vinyl, and fiberglass window alternatives.
Another problem with aluminum clad wood windows is how the sash design does not allow for replacing the glass. Although there have been outstanding quality developments in insulated glass technology over the past ten years, you can be fairly certain that the seal will break sometime within the first 30 years. The clad wood window manufactures build the sash around the glass making it virtually impossible to replace the glazing. The main reason these manufacturers do not incorporate a reglazing feature in their designs is that the glass provides much of the structural integrity of the sash. Once the glass breaks or fails, the entire sash must be replaced. Since these companies change the designs of their window products approximately every five years, the entire window will have to be replaced if the design is obsolete. It is almost like the major wood window manufacturers have built in a mandatory replacement mechanism to help sustain their business model into the future.
When one looks at the epidemic levels of wood rot for aluminum clad wood windows and the inability to replace glass on these windows, it is obvious that replacing a 100 year old wood window is not be the best course of action.
You can access our Facebook page to see pictures of these clad wood window designs and resulting problems.
https://www.facebook.com/media/set/?set=a.386861071369906.89473.118211914901491&type=1#!/media/set/?set=a.386861071369906.89473.118211914901491&type=1
Wednesday, June 6, 2012
Can't See the Forest for the Trees
Over the past five years we have seen a dramatic increase in specifications that demand the usage of Forest Stewardship Council (FSC) certified wood. This is a result of the FSC being the only organization recognized by LEED so the design community has adopted it accordingly. As a result, our company has been influenced to provide FSC wood on many projects. Like lemmings to the sea we all march with our FSC logos. Since the FSC has gained such widespread acceptance through its connection with LEED, I thought I would check into whether the FSC is really adding value. My take on the whole issue is that FSC has failed and has only succeeded in adding cost to the procurement of wood products.
I fully subscribe to the tenets of environmental stewardship. In addition to believing that all wood used in construction should come from properly managed forests, I also recycle, commute to work by bicycle, and even own multiple programmable thermostats. But seriously, our company is dedicated to working with established mills to assure that all of our wood comes from well managed forests.
If you look at the FSC website at www.fsc.org you will be bombarded with a very impressive message that states that we “shall promote environmentally appropriate, socially beneficial, and economically viable management of the world's forests.” After spending a couple of minutes on the site, one gets a warm feeling that the FSC is saving the environment, supporting underdeveloped economies, and improving labor practices across the globe. I truly felt proud about being associated with such a great organization after reading the vision and mission statements. That is until I looked into the major problems with the program.
Although the FSC has over 150 hectares of global forests certified currently, this only amounts to 2% of the world’s forests. It is estimated that approximately 85% of those certified acres relate to wood used in paper production. So the FSC influence is minuscule when one looks at wood used for building materials. Since LEED only accepts forest products certified by FSC, this organization has been perceived to be the gold standard in wood certification. What many people don’t realize is that there are many other credible certification programs available on the market today. The American Tree Farm System (ATFS), Sustainable Forestry Initiative (SFI), Timber Legality and Traceability Verification (TLTV), and Tropical Forest Trust (TFT) just to name a few. Currently the US Green Building Council (USGBC) is considering expanding the certification programs because the coverage of the FSC is so limited.
The FSC certification process also burdens the system with unnecessary costs. Not only does the FSC certify forest managers and owners, but they have a chain of custody (COC) certification for manufacturers and subcontractors who utilize certified wood. This means that small furniture manufacturers, casework companies, and millwork shops need to go through the cost and bureaucracy associated with securing and maintaining a certification. Since there is little to no policing of the certified parties to confirm they are practicing the proper utilization of certified woods, the certification amounts to little more than a right to use the FSC logo in marketing materials.
Some early adopters of the program have benefited from marketing the certification and are commanding higher prices in the marketplace. Not only is there an added cost for FSC wood due to the costs of certification, but this wood is being marketed as special when that really isn’t the case. Recently we purchased FSC certified mahogany from a mill. The cost of the certified wood was 20% greater than wood without a certification. The strange thing about this scenario is that the mahogany that was certified was the same mahogany that had no certification. The certified mahogany came with a three page document verifying the certification of the forest and all parties who touched it. In our current economy do we really want to add such a useless tax on the industry?
It seems to me that there is a better solution for creating a system where all wood used in construction comes from properly managed forests. There has to be a solution that doesn’t add needless cost to the industry and does a better job of policing compliance. A manufacturer shouldn’t have to spend thousands a year to maintain a certification when there are less costly ways to document that all wood was purchased from managed forests.
Tuesday, May 1, 2012
Don't Get Finished on Historic Windows
One of the most overlooked processes in a historic window project is the exterior finish. Many of the specifications that we see have an old paint spec cut and pasted from a previous project that references products that are 20 years old. There is little attention given to surface preparation requirements such as removal of old finishes, neutralization of strippers, moisture content of the substrate, or desired mil thickness. This neglect in using the best materials and proper means and methods has given window restoration a bad name and driven professionals to pursue aluminum or aluminum clad replacements to achieve a low maintenance finished product.
This post will address many of the challenges in finishing historic wood windows. If you follow the basic fundamentals of finish application, your historic window restoration will last for decades.
Neutralization
Most historic wood window projects involve the removal of existing finishes. Although there are several ways to perform this task such as steam ovens and infrared heat guns, the use of chemical strippers is most commonly used. If you use strippers, the stripper must be properly neutralized after existing paint removal or the new finishes will fail to adhere. Unfortunately, the lead-paint abatement function is sometimes performed outside of window restoration on commercial projects so the coordination of paint removal and neutralization is never achieved. We also see a lack of quality control in the field where no testing of neutralization is conducted as a matter of course. Re-View has learned that it is critical to test the pH levels of the window components prior to application of the primer. You want to use pH paper to make sure the wood has reached a level of at least pH7. We often will have to perform multiple neutralization applications if caustic strippers are used since they are absorbed into the fibers of the wood.
Moisture Content
There is nothing a painting contractor hates more than having to check the moisture content of the wood substrate prior to applying finishes. We like to have a moisture content of between 6 to 12 percent. Moisture readings in the high teens and into the 20s will cause the paint to crack or peel. We use a moisture meter made by Lignomat because it is quick and efficient and will test the moisture below the surface level. Sometimes it is challenging to achieve a proper moisture content on a historic window project. The wood can easily achieve moisture contents in the 20’s after neutralization of strippers. Rain on the project site can also contribute to higher than desired moisture readings on the window frames. Other conditions such as ambient temperature and the prevailing relative humidity can affect how long the window component needs to dry to achieve desired readings. We also find that windows located on the North or East elevations tend to dry at a slower rate than the South and West. Given all of these variables, it is understandable why the moisture content of the wood isn’t a cut-and-dried subject.
Surface Preparation
It also makes sense that the surface to be painted should be clean from debris, oil, mold, or dust. In this industry, however, surface preparation is often the most neglected function. We have seen many painters who will apply paint to most anything that doesn’t move. In fact, I saw a dead dog years ago that had a street line painted over it. Although proper surface preparation such as power washing prior to painting forces another step in the process and adds time to the project, it is an essential element to a long lasting finish.
Quality Control
Another step in the finishing process that is often neglected is quality control. We like to incorporate mil thickness and adhesion testing in all of our projects. The mil thickness test can be performed by using a non-destructive testing device that doesn’t damage the finish. Although this meter is expensive, it can be good insurance and forces the painters to pay attention to details. You might be able to gain access to this tool by asking your paint supplier. The adhesion test is another quality control process that can be accessed from the paint manufacturer. Our Sherwin Williams representative has been very helpful in conducting random testing on the adhesion of the finishes to assure proper surface preparation and finish application. A simple cross-cut test can verify if all means and methods have been correctly followed.
Although the content of this post is very elementary, we see far too many projects where the basics are often neglected. If you pay attention to the finishing fundamentals, your historic window finish will perform for many years. Click on the following link to see a slideshow about historic window finishing: https://www.facebook.com/media/set/?set=a.348985885157425.83223.118211914901491&type=1#!/media/set/?set=a.348985885157425.83223.118211914901491&type=1
Friday, March 23, 2012
The Makeup of the Mockup
I was in Birmingham, Alabama yesterday at a historic window mockup review and thought that addressing the importance of a mockup for preservation projects would be a good topic. Re-View is based in the “Show Me State” so we have always been believers in the value of a mockup.
The primary reason one would want to go through the extra cost and time of producing a sample historic window installation is to make sure the owner, architect, general contractor and window subcontractor are all on the same page. Misinterpretations of the scope of work can exist with any of these parties. These constituents might also learn something from performing a complete restoration of one window that might change the initial scope of work. The following are some actual examples of these types of lessons learned during the mockup process:
• We have had many projects where the scope of work called for restoring the existing frame and replicating the sash with an exact match to the existing in mahogany with insulated glass. The frame restoration called for removing loose existing paint, repairing the frame, and then finishing the frame in a matching color to the sash. When the mockup was produced, a new sash with a crisp factory finish and smooth surface was mounted into an old frame with a rough surface finish over the remaining lead paint. In some cases, the contrast of new to existing finishes are more than the owner and architect desire, calling for a change in frame restoration scope.
• On another project we had a requirement for an independent 6 pound water test to be performed on the mockup of an existing historic window. Unfortunately, there are few historic wood windows that were designed to perform at that level. In order to achieve that kind of performance the window needs to be redesigned, which often contradicts the historic intent of retaining the original look of the existing system. The independent test confirmed that a redesigned sill, stool, and weather stripping would be required. Be careful in applying modern ASTM testing standards to historic window designs.
• We had a project that called for laminated glass on a 12-lite over 12-lite double hung window. The specification called for including the mark found in the lower right corner of the glass designating the glass as safety glass. This mark is useful in a conventional one-lite window so the glass is easily confirmed to be laminated. To the project team’s dismay, we discovered how awful 24 glass marks look on a true-divided-lite window. The mockup was convincing evidence that we should eliminate the safety-glass marks on all window panes.
• A State Capitol project demanded historically correct ballistic windows in certain areas of the building that matched the other existing wood windows. The specification called for the window system to withstand a shot at 2,760 feet per second with a 7.62mm 150 grain, lead core full metal copper jacketed ball shot at a range of 15 feet. The construction team decided it was important to secure an independent test of a mockup to provide insurance to all involved that the custom design would in fact perform as required. This mockup helps shield the project team from the legal liability of product performance.
• On a courthouse project with four radius wings, we used two mockups to determine whether the glass and sash should follow the same radius as the building. We installed a flat glass sash next to a radius sash with bent glass in two windows. It was quite evident that the radius unit with bent glass was the preferred design based upon this visual test.
A mockup can also be very valuable for the window restoration subcontractor and the manufacturer of the historic replicas to learn how to perform the work outlined in the construction documents. In this business, every project presents different challenges and means and methods might have to be altered to achieve the desired effect. The construction documents might also be incomplete on certain elements that present themselves during the mockup process. We feel that learning these lessons before full-scale production work begins saves everyone a great deal of costs and headaches. The following are some actual examples of lessons learned from the mockup procedure:
• We had a steel window restoration project that called for a fluoropolymer finish paint combined with a linseed-based glazing putty. During the work on the mockup, we discovered failure of the paint adhesion on the putty. It is not uncommon to discover incompatibilities in paint finishes, putties, sealants, interlayers of laminated glass, and edge seals of insulated glass. Since these incompatibilities are not well documented by the manufacturers of these products, a mockup is a good way to determine whether the prescribed system will perform.
• Back in 2005 we restored 29 triple hung windows that had a sash opening of 8 feet wide by 24 feet tall. Each sash was 8 feet square with nine lites. The specification called for saving the existing glass and replacing broken glass with ¼” clear glass. As is typical of a project requiring the reuse of original glazing, a high percentage of the original glass was broken. The 91-year-old original glass had been permanently tinted by pollutants. The mockup we produced displayed a checkerboard effect where original polluted glass was matched up with new clear glazing.
• Many specifications call for restoring the existing locking hardware onto either a replicated sash with insulated glass or a restored sash converted for receiving insulated glass. We discovered during a mockup a long time ago that the original keeper that receives the sweep arm of the lock is too large to be reinstalled in the area that now has insulated glass. It is possible to purchase precisely replicated hardware to match the existing that has a modified keeper for just this type of application.
• There have been many instances where a manufacturer of historic replica windows failed to perform a mockup installation to test installation methods and fit within the wall cavity. We run across many different wall conditions with varying relationships from exterior masonry, interior framing, interior plaster, and existing trim.
Although a window mockup will add cost and delays to a project, it is certainly a worthwhile investment for all involved. Click on the following link to see pictures of these mockups on our Facebook page: https://www.facebook.com/media/set/?set=a.324097157646298.78668.118211914901491&type=1
Tuesday, February 21, 2012
The Great Debate
Re-View often gets dragged into the debate on what is the proper scope of work for historic windows. It is often a heated subject that is vented out at tradeshows, meetings, and internet chat groups. As is the case with any good brawl, the emotions often run high from all constituents.
Anyone who has been involved in a project with historic fenestration has had to confront the question of what strategy to adopt concerning the windows. There are two opposing camps that best define this debate on historic windows. The following definitions of the window manufacturer and the tree hugger are done in the extreme for dramatic effect:
The Window Manufacturer: This group has one goal and that is to sell more windows. Profitability of the corporation and market share are paramount. As a rule, this group is more interested in increasing volume than doing what is right for the building. Attention to historic detail, performance, and quality are only considered if they are deemed contributory to the bottom line. The use of attractive photographs, slanted test results, and mass advertising has enabled this group to establish a strong influence.
The Tree Hugger: The biggest regret for this group is that they didn’t make it to the Woodstock concert back in 1969. They are extremely passionate about retaining historic fabric on a preservation project. All means, methods, and materials must be focused on restoring the window system back to its original form. Any deviation from that course is an abomination. Since this group is so fragmented and lacks the sex appeal or the marketing budgets of the manufacturers, they often remain the soft voice in the debate. If one listens to their common sense position on the subject, however, the message is very compelling and powerful.
So if you are an owner, architect, or general contractor how do you make sense of these diametrically opposed viewpoints concerning the subject? Do you replace your historic windows with new units, or do you restore every element back to its original state? The answer to that question depends on a number of factors such as the historic significance of the property, the use of the building, the budget, and the construction schedule. It also depends upon where the owner and architect land on the debate spectrum.
I am a firm believer that it helps to have input that is void of emotion to assist in determining an opinion on this subject. Unfortunately, there are few unbiased studies that exist on the topic. If you ask the manufacturers for data, they will produce internal test results that allege 74% energy savings with their products and claims of no future maintenance. If you ask the tree huggers, they will argue superior performance through complete restoration combined with a storm window and pull out the social responsibility card.
We have seen an independent study that is worthy of consideration. Robin E. Whitehurst and Susan Turner of Bailey Edward authored a study in 2009 that evaluated different treatments for windows at Lincoln Hall at the University of Illinois. The study compared replacing the windows with aluminum clad wood units, restoring the existing windows and retrofitting them with insulated glass, and adding a storm window to a repaired window.
The three courses of action were evaluated on energy performance, initial cost, maintenance costs, life cycle costs, and effects on the historic fabric. The study makes for good reading if you are wrestling with how to attend to historic windows on your project.
You can access the study through the following link:
http://www.illinoishistory.gov/ps/Lincoln%20Hall%20Window%20Life%20Cycle%20Study%202008%20%20Univ.%20of%20Illinois%20at%20Urbana%20Champaign.pdf
Thursday, November 10, 2011
Do You Have the Energy
The construction industry has been sold a story that historic windows are energy hogs that are largely responsible for the depletion of fossil fuels in the United States. I am not going to dive into that debate at the moment because I am not in the mood to mud wrestle with the major window manufacturers. This post is going to address the different options you have in converting historic wood or steel windows into energy efficient systems. Re-View has been successful in upgrading the energy energy performance of 100+ year old windows to meet or even exceed modern manufactured windows.
The most common method known in the construction industry for enhancing the performance of an old single-paned window is the use of a storm window. Storm windows have come a long way in the last 15 years. Instead of the flimsy mill-finished behemoths of yesteryear as pictured below, the new storm window designs are made of extruded aluminum and have low profile sash and frames so they don't distract from the window. You can match arches at the window heads and even find storms that have bent glass to match the radius of a curved window. There are also many different methods of attaching the storms to facilitate simple cleaning and maintenance. Removable fasteners, operable clips, and magnetic mounting techniques are used to eliminate the albatross effect of a traditional storm window.

Although storm windows sound very simple in concept, you can run into problems. The first is to make certain you are measuring the window opening in the same manner as the manufacturer. You may also need to take several width measurements for tall windows to adjust for irregularities. We have seen many installations where the storm just didn't fit the opening. It is also critical to allow for some ventilation between the storm window and the existing window system. We had a project a couple of years ago where moisture caught in the wall cavity caused condensation between the storm and the primary window. If you are doing a residential project, it is essential to pay attention to egress codes; fixed storms or a design that limits the opening size may not be a possibility.
Re-View is currently engineering an energy panel system that puts a typical storm window on steroids. Can you imagine a historic wood or steel window with an R Value approaching 7 or even higher? Our product has a frame made of a combination of aluminum and wood with high-efficiency insulated glass with multiple Low E coatings. By combining aluminum with wood, we are able to increase the structural characteristics while we advance the thermal performance of the framing material. We also enable the customer to apply custom finishes by either staining the wood or matching any custom interior enamel finish. We can fabricate the system in virtually any wood species so matches to interior millwork will be seamless as evidenced by the picture below of one of our installation in a historic train depot. Please contact us to discuss how such a revolutionary technology might be incorporated into your next project.

Another way to improve the energy performance of historic windows is to convert the single pane glass to insulated glass during the restoration process. We haven't found many steel windows that have the required depth to enable such a conversion, but wood windows are ideal candidates. On a typical wood window sash that is 1-3/4" thick, we are able to remove approximately 1/4" from the interior profile of the window to allow for the thicker glass. (See picture below) The glass is glazed with a mahogany stop that is completely primed on all sides and both ends prior to installation. Don't be tempted to use glazing compound like the original single pane installation since the compound is incompatible with the insulated glass seal. This will only accelerate seal failure of the glass. The wood stop is milled to a profile that replicates the glazing compound so you can't tell the difference between a stop glaze and the old compound glaze.

Insulated glass can also be introduced into a historic window system by fabricating an exact replica of the original sash with the exception of the insertion of insulated glass. The new sash would share the design of the original in all aspects such as size, shape, profiles, and joinery. We are able to include up to 5/8" insulated glass into a 1-3/4" thick replicated window. The sash is then hung into the original window frame using the existing pulleys and augmenting the weights to balance the heavier glass. Re-View is one of the largest historic wood window manufacturers in the country, using virtually any wood species and glass type available. The picture below shows a radius or bent sash replica we fabricated for a Governor's mansion project.

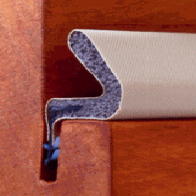
Finally, there are ways to incorporate modern weather stripping into the historic window design without changing the form or function. We use what is called fin seal in hidden areas such as the edge of the sash or the back side of the sash stop. Fin seal does an excellent job of eliminating air infiltration. We also use polyethylene clad, urethane foam seals at critical areas such as the rails of a double hung window or the perimeter of the frame of a casement as pictured below. All of these weather strips are invisible when the window is closed. In addition to the modern weather strips, we are still believers in some of the traditional metal weather seals since they last forever and are effective performers. We have achieved independently tested air infiltration rates that are actually superior to the published rates from the major window manufacturers.

As you can see from the above, there are many options to advancing the energy performance of historic wood and steel windows. All it takes is a little time plotting a strategy that works best for your window design, targeted performance values, use of window, and budget.
The most common method known in the construction industry for enhancing the performance of an old single-paned window is the use of a storm window. Storm windows have come a long way in the last 15 years. Instead of the flimsy mill-finished behemoths of yesteryear as pictured below, the new storm window designs are made of extruded aluminum and have low profile sash and frames so they don't distract from the window. You can match arches at the window heads and even find storms that have bent glass to match the radius of a curved window. There are also many different methods of attaching the storms to facilitate simple cleaning and maintenance. Removable fasteners, operable clips, and magnetic mounting techniques are used to eliminate the albatross effect of a traditional storm window.

Although storm windows sound very simple in concept, you can run into problems. The first is to make certain you are measuring the window opening in the same manner as the manufacturer. You may also need to take several width measurements for tall windows to adjust for irregularities. We have seen many installations where the storm just didn't fit the opening. It is also critical to allow for some ventilation between the storm window and the existing window system. We had a project a couple of years ago where moisture caught in the wall cavity caused condensation between the storm and the primary window. If you are doing a residential project, it is essential to pay attention to egress codes; fixed storms or a design that limits the opening size may not be a possibility.
Re-View is currently engineering an energy panel system that puts a typical storm window on steroids. Can you imagine a historic wood or steel window with an R Value approaching 7 or even higher? Our product has a frame made of a combination of aluminum and wood with high-efficiency insulated glass with multiple Low E coatings. By combining aluminum with wood, we are able to increase the structural characteristics while we advance the thermal performance of the framing material. We also enable the customer to apply custom finishes by either staining the wood or matching any custom interior enamel finish. We can fabricate the system in virtually any wood species so matches to interior millwork will be seamless as evidenced by the picture below of one of our installation in a historic train depot. Please contact us to discuss how such a revolutionary technology might be incorporated into your next project.

Another way to improve the energy performance of historic windows is to convert the single pane glass to insulated glass during the restoration process. We haven't found many steel windows that have the required depth to enable such a conversion, but wood windows are ideal candidates. On a typical wood window sash that is 1-3/4" thick, we are able to remove approximately 1/4" from the interior profile of the window to allow for the thicker glass. (See picture below) The glass is glazed with a mahogany stop that is completely primed on all sides and both ends prior to installation. Don't be tempted to use glazing compound like the original single pane installation since the compound is incompatible with the insulated glass seal. This will only accelerate seal failure of the glass. The wood stop is milled to a profile that replicates the glazing compound so you can't tell the difference between a stop glaze and the old compound glaze.

Insulated glass can also be introduced into a historic window system by fabricating an exact replica of the original sash with the exception of the insertion of insulated glass. The new sash would share the design of the original in all aspects such as size, shape, profiles, and joinery. We are able to include up to 5/8" insulated glass into a 1-3/4" thick replicated window. The sash is then hung into the original window frame using the existing pulleys and augmenting the weights to balance the heavier glass. Re-View is one of the largest historic wood window manufacturers in the country, using virtually any wood species and glass type available. The picture below shows a radius or bent sash replica we fabricated for a Governor's mansion project.

Finally, there are ways to incorporate modern weather stripping into the historic window design without changing the form or function. We use what is called fin seal in hidden areas such as the edge of the sash or the back side of the sash stop. Fin seal does an excellent job of eliminating air infiltration. We also use polyethylene clad, urethane foam seals at critical areas such as the rails of a double hung window or the perimeter of the frame of a casement as pictured below. All of these weather strips are invisible when the window is closed. In addition to the modern weather strips, we are still believers in some of the traditional metal weather seals since they last forever and are effective performers. We have achieved independently tested air infiltration rates that are actually superior to the published rates from the major window manufacturers.
As you can see from the above, there are many options to advancing the energy performance of historic wood and steel windows. All it takes is a little time plotting a strategy that works best for your window design, targeted performance values, use of window, and budget.
Subscribe to:
Posts (Atom)

